# 示例:基于影像数据集进行深度学习
如果我们已经在 HeyCloud 中管理了大量的影像数据,那么可以直接连接到 HeyCloud 进行数据的深度挖掘。这里我们实现一个对美军基地的飞机进行自动检测统计的功能。
# 1. 设置深度学习工具
这里我们选用了 darknet 框架,使用 YOLOv4 算法模型,并设置启用了 YOLOv4 的数据随机旋转、注意力机制等选项来提升模型效果。
# 2. 准备训练样本
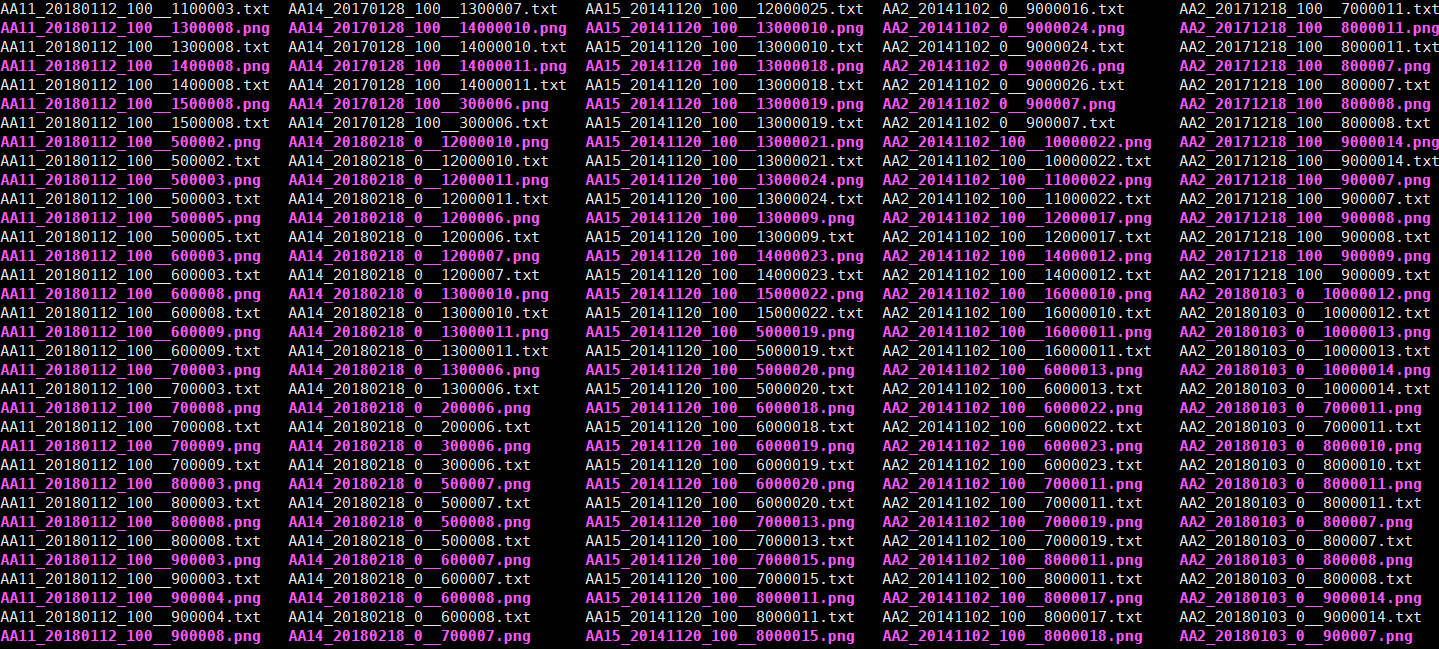
首先选取了一些影像数据集作为训练集,并对影像中不同类型的飞机都进行了标注,形成下面的样本数据:
# 3. 生成训练集:
现在,我们的深度学习工具就可以从 HeyCloud 的影像数据集直接提取数据并生成相应的训练集了:
request_url = '/http://192.168.31.14:9000/heycloud/api/data/idataset/%s/extract' % (args['idatasetId'])

def async_request(request_url, params, headers, height, width, callback=None, save_path='', **kwargs):

    if callback:
        def callback_with_args(response, *args, **kwargs):
            print(save_path)
            kwargs['save_path'] = save_path
            kwargs['height'] = height
            kwargs['width'] = width
            callback(response, *args, **kwargs)
        kwargs['hooks'] = {'response': callback_with_args}

    kwargs['data'] = params
    kwargs['headers'] = headers
    kwargs['url'] = request_url
    kwargs['timeout'] = 60
    thread = Thread(target=post, kwargs=kwargs)
    return thread

def bytes_to_images(response, save_path, *args, **kwargs):
    if response.status_code == 200:
        arr = np.frombuffer(response.content, dtype=np.uint8)
        size = int(arr.size / 3)
        b0 = arr[0:size]
        b1 = arr[size:2*size]
        b2 = arr[2*size:3*size]

        img0 = Image.frombytes(mode="L",size=(kwargs['height'],kwargs['width']),data=b0,decoder_name="raw")
        img1 = Image.frombytes(mode="L",size=(kwargs['height'],kwargs['width']),data=b1,decoder_name="raw")
        img2 = Image.frombytes(mode="L",size=(kwargs['height'],kwargs['width']),data=b2,decoder_name="raw")

        Image.merge("RGB", (img0, img1, img2)).save(save_path)
    else:
        print(response.content)

def request(ims_dir,
            height_min,
            width_min,
            height_max,
            width_max,
            slice_height,
            slice_width,
            sp_slice_height,
            sp_slice_width,
            image_height,
            image_width,
            overlap,
            post_params,
            request_url,
            post_headers):
    windows, save_path = extract_windows(ims_dir,height_min,width_min,height_max,
                                          width_max,slice_height,slice_width,
                                          sp_slice_height,sp_slice_width,image_height,
                                          image_width,overlap)

    threads = []
    for window, path in zip(windows, save_path):
        post_params['bbox'] = window
        try:
            threads.append(async_request(request_url,
                                          json.dumps(post_params),
                                          post_headers,
                                          slice_height,
                                          slice_width,
                                          callback=bytes_to_images,
                                          save_path=path
                                        ))
        except:
            continue

    return threads
训练集会保存到我们设置的临时目录下:
# 4. 训练、测试
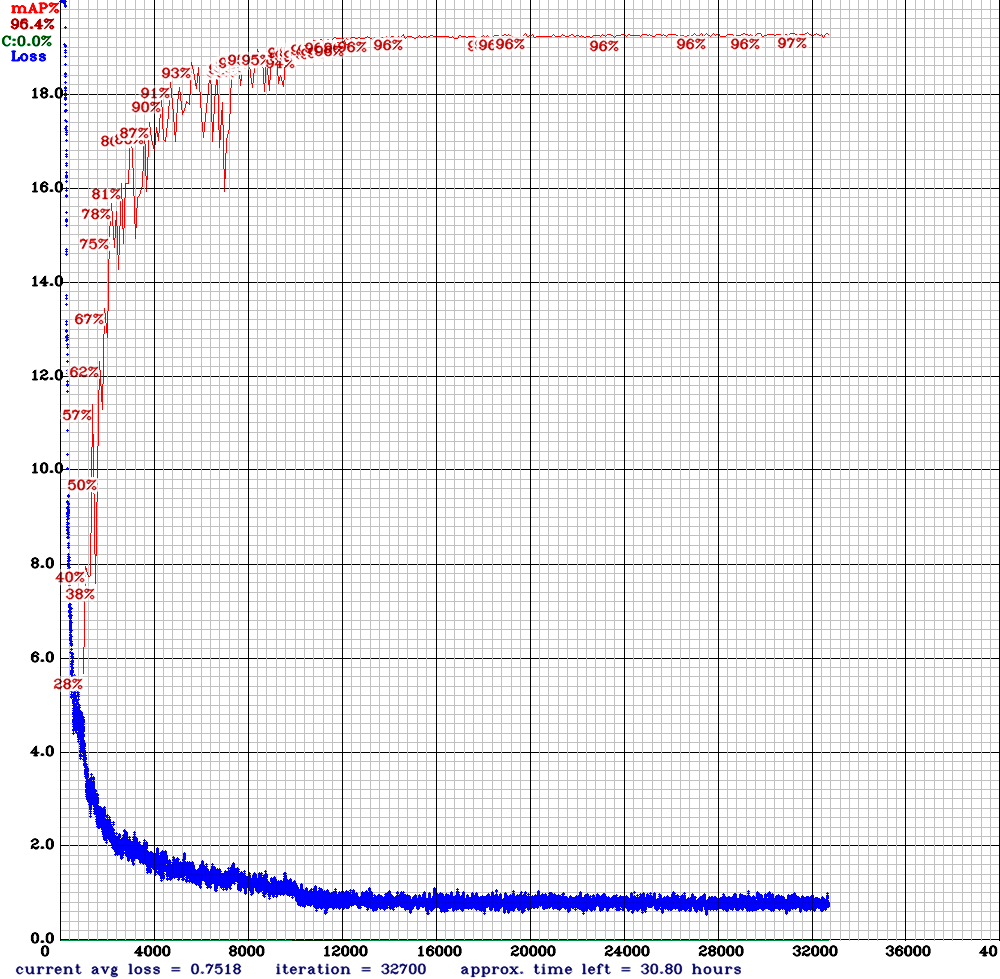
通过执行darknet detector train train_data/cfg/train.data train_data/cfg/yolov4-sam-mish.cfg train_data/cfg/yolov4-sam-mish.weights -map -dont_show命令,开始训练模型:

训练的 Loss 和 mAP 曲线图:
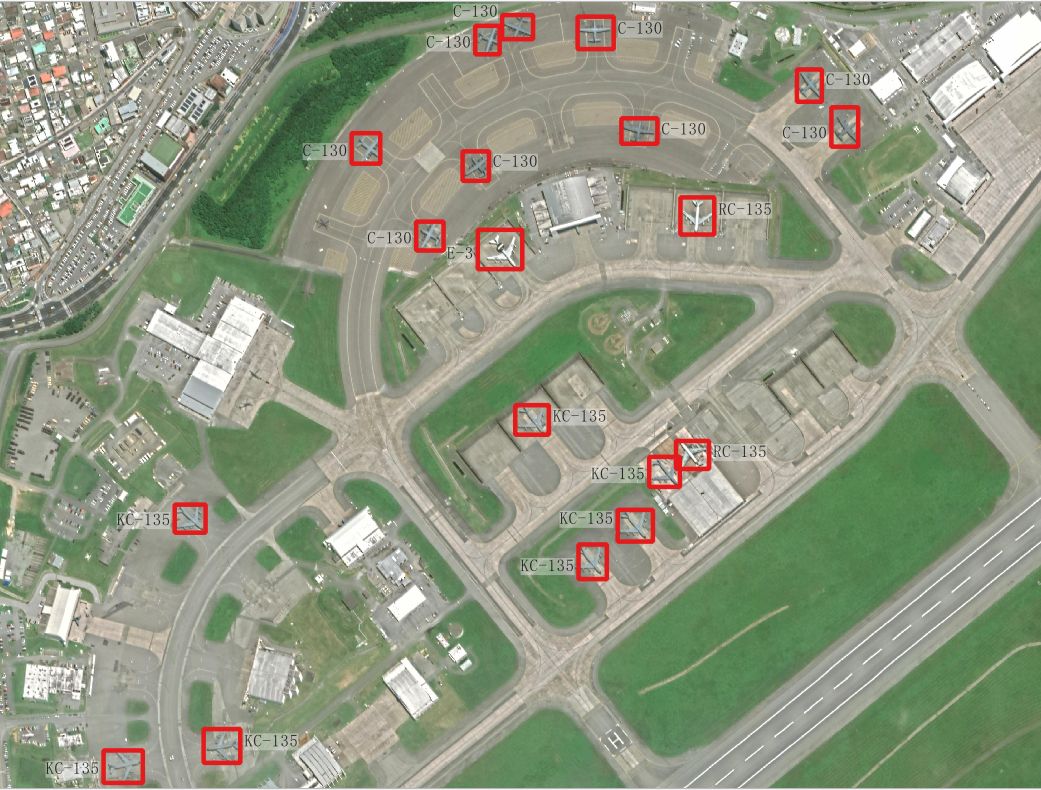
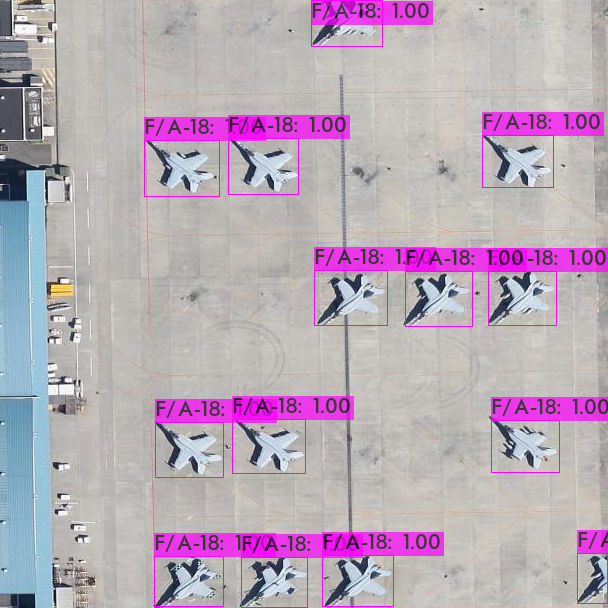
训练结束后,通过执行darknet detector test test_data/cfg/test.data test_data/cfg/yolov4-sam-mish.cfg test_data/cfg/yolov4-sam-mish_4000.weights test_data/AA14_test.png -thresh 0.25命令对单张图片进行测试,效果如下:
# 5. 线上部署和调用
使用训练得到的模型文件yolov4-sam-mish_last.weights结合 darknet 自带的 python 接口darknet.py进行封装,将模型部署到线上。这样,线上应用也可以直接连接 HeyCloud 影像数据集,提取数据并调用模型,实现在线的飞机检测统计功能。

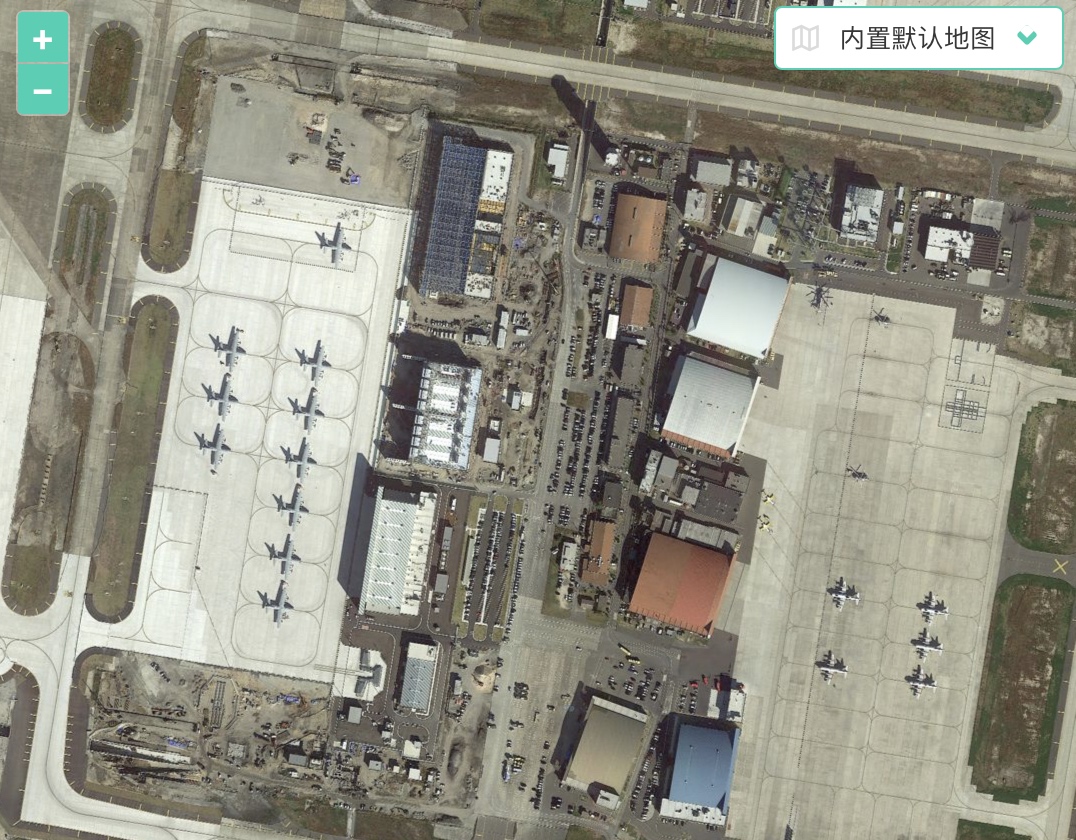
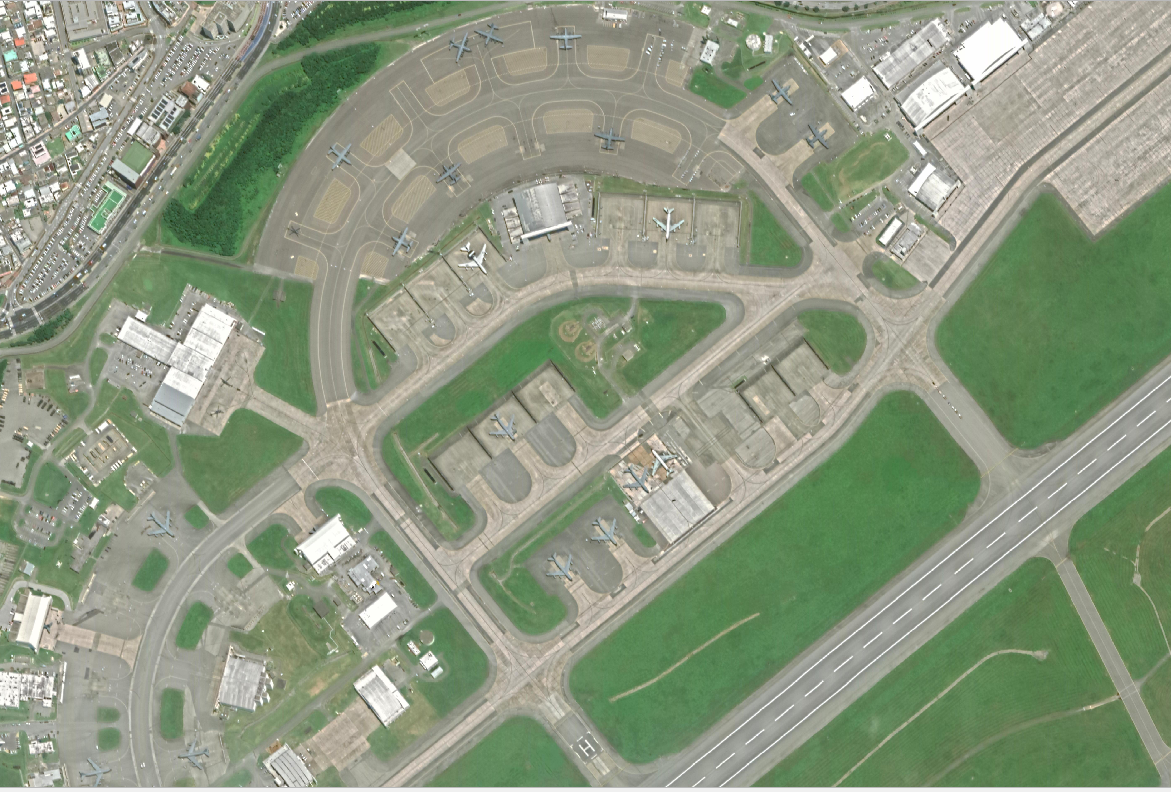
现在,我们可以选择其它同类影像的任意目标区域进行在线目标提取:
import json
import requests
headers={"content-type":'application/json'}
data={
    "bbox":[14221471,3043001,14222795,3044095],
    "idatasetId": "bcd4e9c2-99a6-4fd2-81dc-cad06363c985",
}
url="http://192.168.31.14:5001/detection/aircraft"
r=requests.post(url=url,data=json.dumps(data),headers=headers)
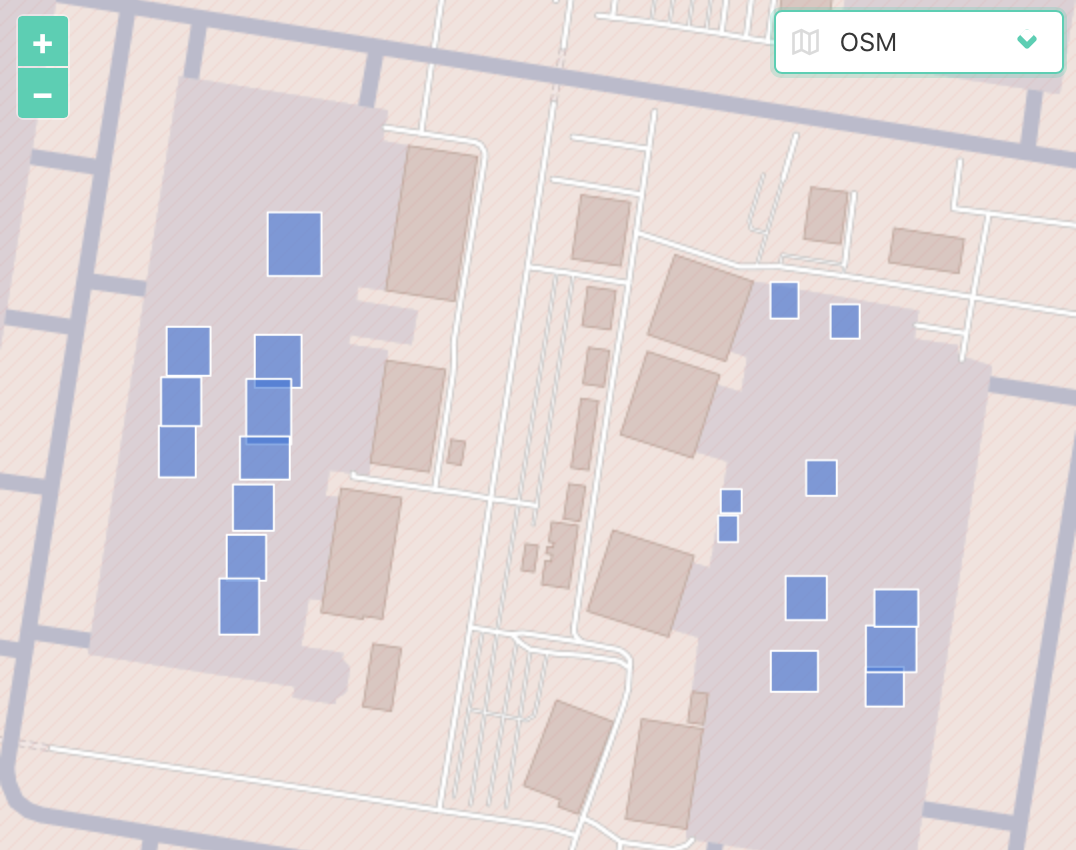
在这个请求中后台会将这个目标区域切分为若干符合深度学习模型的尺寸,然后分别调用模型进行预测,最后把预测结果进行合并:
def inference(net_config_file,data_file,weights,
              batch_size,images_txt_path,infer_res_txt_dir,
              conf_thresh,
              sp_res,
              bbox,
              nms_thresh,
              results_dir
              ):
    random.seed(2222)
    network, class_names, class_colors = darknet.load_network(
        net_config_file,
        data_file,
        weights,
        batch_size=batch_size
    )
    images_path = load_images(images_txt_path)
    for name in class_names:
        txt = os.path.join(infer_res_txt_dir, str(name) + '.txt')
        if os.path.exists(txt): os.remove(txt)
    index = 0
    while True:

        prev_time = time.time()
        if index >= len(images_path):
            break
        image_name = images_path[index]
        try:
            _, detections, nbox, w, h =  image_detection(
                image_name, network, class_names, class_colors, conf_thresh
            )
        except:
            index += 1
            continue
        print(detections, nbox)

        generate_infer_res_txt(infer_res_txt_dir, image_name,
                        detections, nbox, class_names, w, h)
        darknet.print_detections(detections)
        fps = int(1/(time.time() - prev_time))
        print("FPS: {}".format(fps))
        index += 1

    df_post_process = post_process(infer_classes_files_dir=infer_res_txt_dir,
                                   sp_res=sp_res,
                                   bbox=bbox,
                                   edge_buffer_test=1)
    json = get_nms_add_geos_geojson(df=df_post_process,
    save_dir=results_dir,
    nms_thresh=nms_thresh,
    conf_thresh=conf_thresh)
    return json
最终效果: